In this article we will see different methods of authentication using new Login control which is introduced in ASP.NET 2.0. The first method will deal with MemberShip API and will show that how simple it is to authenticate using new API. Second method describes the custom authentication against the SQL SERVER 2000 database. And finally we will see custom authentication against an XML file.
Introduction:
In this article we will see different methods of authentication using new Login control which is introduced in ASP.NET 2.0. The first method will deal with MemberShip API and will show that how simple it is to authenticate using new API. Second method describes the custom authentication against the SQL SERVER 2000 database. And finally we will see custom authentication against an XML file.
Configuring SQL SERVER 2000 to Store MemberShip Details:
The first task that you need to perform is to configure your SQL SERVER 2000 database so that it can store membership details. The easiest way is to use the aspnet_regsql.exe tool which will open graphical wizard and guide you to configure your custom database to hold membership details. After providing the information to the wizard you will see few tables created in your database. Here is a screen shot which shows all the tables created.
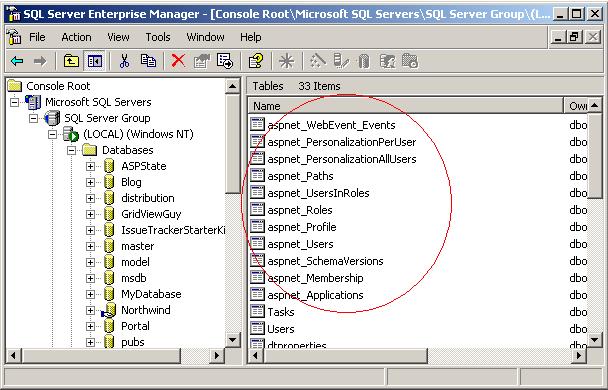
aspnet_users table holds the information about users which includes UserID and UserName.
aspnet_membership table holds the additional information about user which include Password, Email, Password Question etc.
Setting Up the Correct Provider:
After creating the tables you must edit the Web.config file to reflect the provider settings. You should also set the authentication mode to "Forms" in web.config file.
| <connectionStrings>
<add name="ConnectionString" connectionString="Server=localhost;Database=Task;Trusted_Connection=true"/> </connectionStrings> <system.web> <!-- Membership Provider Settings --> <membership defaultProvider="ThingsTODOProvider"> <providers> <add name="ThingsTODOProvider" type="System.Web.Security.SqlMembershipProvider" connectionStringName="ConnectionString" minRequiredPasswordLength="5" minRequiredNonalphanumericCharacters="0"/> </providers> </membership>
|
I have included some of the basic settings just to keep things simple. First I included a connectionStrings section which includes the connection string to the database. Inside the <system.web> tag I have defined my membership provider using the membership defaultProvider attribute.
Inside the <providers> tag you can see that my provider is of type "System.Web.Security.SqlMembershipProvider" which means it will store the membership details inside the SQL SERVER database. The connectionStringName property of provider tag defines the connection string to be used to connect to the required database.
minRequiredPasswordLength defines the minimum length of the password.
Adding Users into the Database Tables:
Before we use the Login Control to authenticate users let's first add few users to the tables. In this article I will use the pre-made custom screens to add a new user. Simply select the ASP.NET Configuration from the Website menu.

This will open configuration screens. You can select Security option which will let you add new users to the database. When you add a new user go to your database tables and see that the aspnet_users and aspnet_membership tables are populated.
Using Login Control to Authenticate Users:
Simply, drag and drop the Login control on the form. You can change the appearance of the control by using the Auto-Format feature. Now if you press the Login button the username and password which you provide will be authenticated against the credentials stored in the aspnet_users and aspnet_membership tables. You can use the DesinationPageUrl property of the Login control to redirect the user after they have been successfully authenticated.
Authenticating Against a Custom Database:
If you want to authenticate a user against your own custom database then you can use the Authenticate event of the Login control. Here is a small example that shows how to achieve it.
| // Use Authenticate event if you want to do custom authentication
protected void Login1_Authenticate(object sender, AuthenticateEventArgs e) { string userName = Login1.UserName; string password = Login1.Password; bool result = UserLogin(userName, password); if (result) e.Authenticated = true; else e.Authenticated = false; } private bool UserLogin(string userName, string password) { string query = @"SELECT UserName FROM Users WHERE UserName = @UserName AND Password = @Password"; string connectionString = (string)ConfigurationManager.ConnectionStrings["ConnectionString"].ConnectionString; SqlConnection myConnection = new SqlConnection(connectionString); SqlCommand myCommand = new SqlCommand(query, myConnection); myCommand.Parameters.AddWithValue("@UserName", userName); myCommand.Parameters.AddWithValue("@Password", password); myConnection.Open(); string userId = (string) myCommand.ExecuteScalar(); myConnection.Close(); if (userId != null && userId.Length > 0) return true; else return false; }
|
As you can see that I am simply sending the values from the Login control to UserLogin method and returns true or false based on the authentication status.
| When using custom authentication always remember to set the Authenticated property of the Login control to true or false based on the result of authentication. Also when authenticating a user against a custom database you don't need to provide the membership settings in the web.config file. |
Authenticating Against an XML File:
You can also authenticate a user against an XML File. Here is the simple xml file:
| <?xml version="1.0" encoding="utf-8" ?>
<Users> <User> <userName>azamsharp</userName> <password>azam</password> </User> <User> <userName>John</userName> <password>Doe</password> </User> <User> <userName>Sally</userName> <password>Beaver</password> </User> </Users>
|
And here is the code that iterates through the XML File and authenticates the user.
| private bool UserLoginAgainstXMLFile(string userName, string password)
{ string uName = null; string pass = null;
XmlDocument xDoc = new XmlDocument(); xDoc.Load(Server.MapPath("Users.xml")); XmlNodeList nodeList = xDoc.GetElementsByTagName("User"); foreach (XmlNode xmlNode in nodeList) { // get the childNodes XmlNodeList childNodes = xmlNode.ChildNodes; foreach (XmlNode childNode in childNodes) { if (childNode.Name == "userName") { if (childNode.InnerText == userName) uName = userName; } if (childNode.Name == "password") { if (childNode.InnerText == password) pass = password; } } if (uName != null && pass != null) return true; } return false; }
|
I simply load the XML File into the XmlDocument object and checks for the username and password. If the credentials are found true else false is returned.
I hope you liked the article. Please also download the complete code at the end of this article.
| If you are one of those thousands of people who are benefited from GridViewGuy articles and want to show your love then you will be interested in giving a donation.
Once, again thank you very much and remember its because of you FINE people that this website is up and running. |
| Export Button is a custom control that let's you export your DataGrid or TextBox data to several different formats. The control is extremely easy to use and also exposes design time features. In this article I will discuss some of the features of the Export Button and how it benefits the developer. |