Acceptance testing is an important phase in the application life cycle. This step includes the customer or the quality assurance group running test which in their opinion define the validity of the application. The main problem with this type of testing is the communication barrier between the customer and the developer. The customer cannot understand the code implemented by the developer hence they have to settle for an ambiguous language which can be understood by the both parties. In this article we are going to take a look at the Cucumber framework which helps to create a communication bridge between the customer and the developer.
Why Cucumber?
There are a lot of tools which helps to write acceptance test but most of them uses their own jargon which is hard for a customer to understand. One of those tools is Fitnesse which was developed some time ago. If you are interested in learning more about Fitnesse then check out the following articles:
Introduction to Fit and Fitnesse
Podcast on Introduction to Fit
Podcast on Introduction to Fit and Fitnesse
Cucumber brings a new meaning to writing acceptance test since it uses plain English to express the behavior. The emphases are on the word plain English which can be understood by the developer as well as the customer. Cucumber uses the Gherkin language to express the behavior. Gherkin comprises of number of keywords with the most important “Given”, “When”, “Then” and “And”. You can find about the Gherkin language using the link below:
Gherkin Language
Downloading and Installing Cucumber:
Cucumber is available as a GEM for the Ruby Framework which means that first you need to download and install the Ruby Framework. This is extremely simple since you only need to download the Ruby One Click Installer and execute it. The single click installer is available here.
After downloading and running the Ruby framework you must download Cucumber. This is accomplished by using the following command:
You can consider Rubygems as package manager whose purpose is to download and install different packages for the Ruby framework. The gem install command will install the gem on your machine. Since, we will be using IronRuby to communicate with the .NET CLR objects it is a good idea to create the Iron version of the Cucumber which technically is just a wrapper over the real Cucumber gem.
Create a batch file named “icucumber.bat” and add the following code in the file:
As, you can see the batch file simply calls the Cucumber framework which was installed by downloading the Ruby gem.
Scenario:
We will take a very simple scenario to understand the workings of the Cucumber. The scenario revolves around creating an API for finding if the number is prime or not. We will not be implementing the complete API but we will be focusing on how to perform acceptance testing using Cucumber.
When to Run Acceptance Test?
In my opinion acceptance test should be run after each feature is implemented. Once, you are done unit testing your domain, user interface, database then you can perform acceptance testing. The reason is that the outcome of acceptance test depends on the communication between different components of the application. Hence, the acceptance test is only successful when all the different components involved are working as expected.
Writing Down the Feature:
Let’s begin with our acceptance testing using Cucumber. The first thing that you need to do is to write a story card about the feature to be implemented. Usually this happens when you are sitting down with your client having a cup of coffee or in a virtual world. The feature is written in plain English but can be written in 37+ other languages which will suit the audience around the world. The feature file is a simple text file with “.feature” extension. Here is one of the features of the PrimeService:
Let’s dissect different parts of the feature file.
Feature: The description of the feature
You can even define the feature further more by adding a detailed description as shown below:
“As, a crazy person I need to find if the number is prime or not!”
Scenario Outline: The scenario outline enables you to write examples for the scenario. The examples help to test the feature with the expected results.
Given: The data available for the feature to work
When: The action that takes place to invoke the action
Then: The result of “When” which should be used to compare the final results.
Examples: This is the dummy data provided by the client/customer which in their opinion makes the feature accepted.
The <number> and <result> markers will be filled by the values from the Examples. This concept is borrowed from the Fitnesse framework.
There are other keywords which include “BUT” and “AND” which we will discuss in future articles. At this point our feature file is completed. Take a moment to review the feature file. You will notice that the language used in the feature file serves as a common language which can easily be understood by the developers as well as customers.
Place the feature file in a folder called “features”. Now, let’s move on to write some code to satisfy our feature and get it accepted.
Implementing Steps to Satisfy the Acceptance Tests:
Include a new folder called “step_definitions” to your project which will contain the code that will be executed against the feature files. Add a new Ruby class called “prime_service.steps.rb” inside the “step_definitions” folder.
Let’s start by including some of the required gems and libraries.
The first line includes the “rubygems” library to the project. The “spec/expectations” is also included in the framework. The .NET CLR class library project which includes the implementation of the PrimeService.cs class contained in the BusinessObjects.dll is also referenced by the project using the File.expand_path method.
At this point you have all the necessary plumbing work done. You can even go to the command line and execute your feature file as shown below:
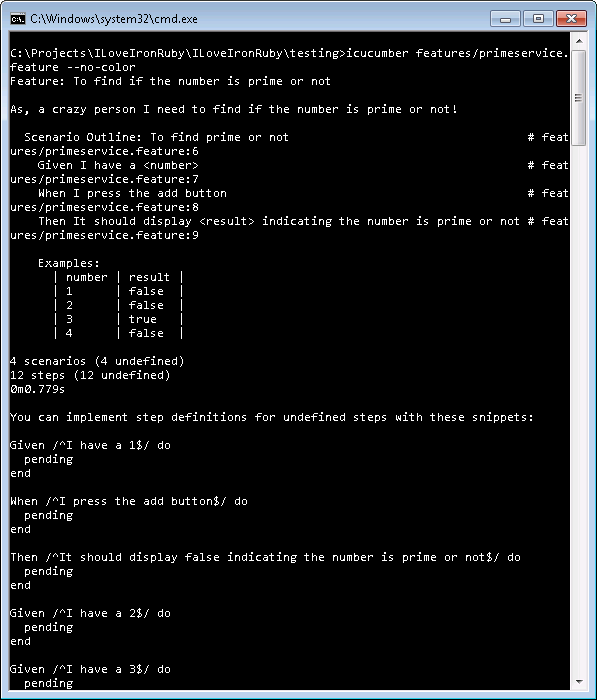
As, you can see that Cucumber displayed our feature along with the necessary steps to pass this test. Cucumber is helping us to implement the steps. You can either copy these steps in your prime_service.steps file or you can write your own steps manually.
We will take the later route and write the steps manually. When writing steps manually it is a good idea to copy the steps from the feature file. This mean copying “Given”, “When”, “Then”, “And” and “But”. Here is our updated prime_service.rb file with steps copied from the feature file.
The “Before” step is triggered before running any step. You can relate the behavior of “Before” with the “Setup” attribute in NUnit, MbUnit frameworks.
Let’s take a closer look at the “Given” step.
One thing to notice is that the step text must exactly match the text in the feature file. That is why it is suggested to copy paste the feature directly from the feature file and paste it into the step Ruby code. The <number> marker is replaced by the $number variable which will be replaced by the values in the Examples defined in the feature file. Let’s continue with our step definitions and make this acceptance test pass. Here is the “Given” step defined with the “Before” step.
The “Before” step initializes the PrimeService instance which is defined in a CLR assembly “BusinessObjects”. The “Given” step moves the input parameter number value to a local variable @number which will be used later in the “When” step.
The “When” step is defined below:
Since, the parameters are passed to our step as string it is our responsibility to convert them to appropriate types. When calling the IsPrime method on the primeService instance we converted the @number parameter to integer by using the “.to_i” method. The result of the operation is stored in the variable called @result.
Now, it is the responsibility of the “Then” step to indicate if the expectation was met or not. The “Then” step is defined below:
The “result” variable contains the value that you originally setup during the feature building phase. And the “@result” will contain the actual value that you received by invoking the IsPrime method of the PrimeService. Since, in Ruby there is no concept of Boolean types we are converting our expected result to string before comparing.
Let’s run the above feature assuming that IsPrime method is implemented correctly.
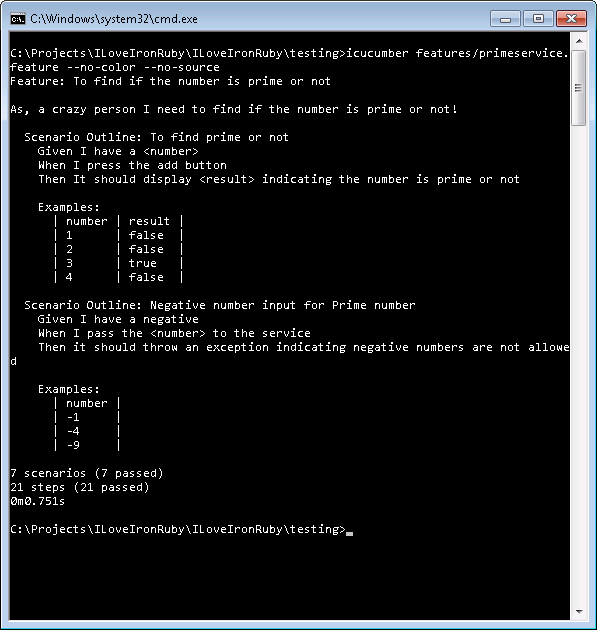
The screenshot shows that our features passed. We have included one more feature which makes sure that an exception is thrown when the user enters a negative number. We have included that feature in the same primeservice.feature file as a separate Scenario Outline. You can download the sample and check it out yourself.
Conclusion:
Cucumber is a leap forward from the old acceptance testing tools. It frees the developer and the customer to understand another language and uses pure natural language to communicate the information. In the next article we are going to discuss advanced features of Cucumber framework.
[Download Sample]