MongoDb is a schema free, scalable, high performance document database. In this article we will demonstrate how quickly you can make a blog using ASP.NET MVC Framework, MongoDb and the C# driver.
Disclaimer:
This article does not focus on creating the blog theme, logo or design. The article shows how to use ASP.NET MVC with MongoDb to quickly setup a blog engine. In other words do not expect any pretty layout and design for the blog.
Database Schema:
The real beauty of MongoDb database is that it is schema independent. We will develop our schema as we progress in our application. The idea of being schema independent also forces us to focus on the domain. And we all know that domain is the heart of an application.
Creating Blog Database:
Our first task is to create the blog database. Since this step must be performed only once per application we placed it under the Application_Start event inside the Global.asax file.
Invoking CreateBlogDatabase multiple times will not override the database but returns the database if it already exists or create a new database if it does not exists.
Adding Blog Posts:
We will first focus on adding posts to our blog. This way it will be much easier to show a list of posts.
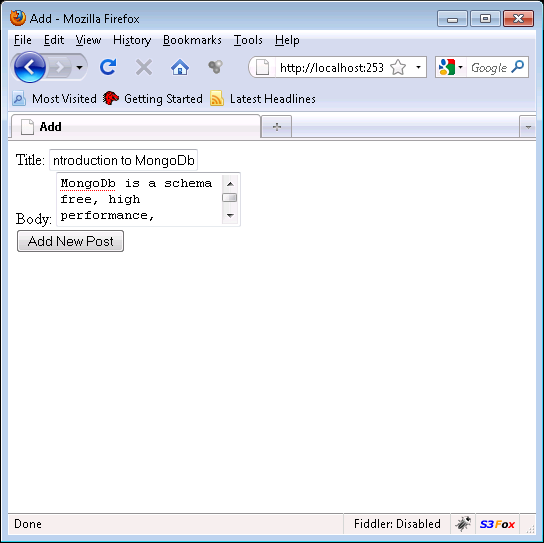
The view Add.aspx is responsible for getting the input from the user. The input consists of the "Title" and the "Body". The Add.aspx view is implemented below:
The Add view is shown below:
When the form is submitted the "Add" action is invoked on the PostController. The "Title" and the "Body" fields are posted back to the action. The Add action is shown below:
We just used the basic validation to make sure the "Title" and the "Body" fields are filled. If you are interested in using DataAnnotations attribute then you can check out the following resources:
The _postRepository.Save method is responsible for persisting the post to the MongoDb database.
Nothing complicated in the above code! We are simply inserting the post into the posts collection using the Insert method and then disconnecting from the MongoDb server.
Displaying Posts on the Page:
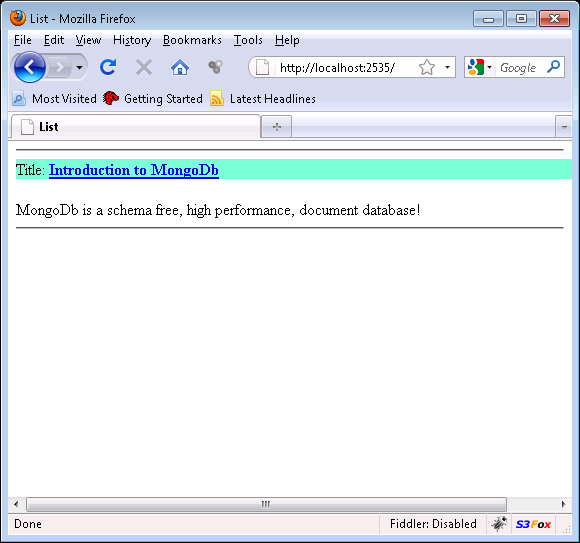
Now that we have inserted a post in the MongoDb database we need to display it on a view. We will call the view "List". The implementation of the view is shown below:
The List view is shown below:
When the ActionLink is invoked it will pass the id of the post to the Detail action in the PostController. The Detail action is implemented below:
The Detail action triggers the _postRepository.GetById method which returns the selected post. The selected post is then sent to the view. The implement ion for the GetById is shown below:
The document is searched by using the "_id" key which is the unique document ID created by MongoDb for each document stored in the MongoDb database.
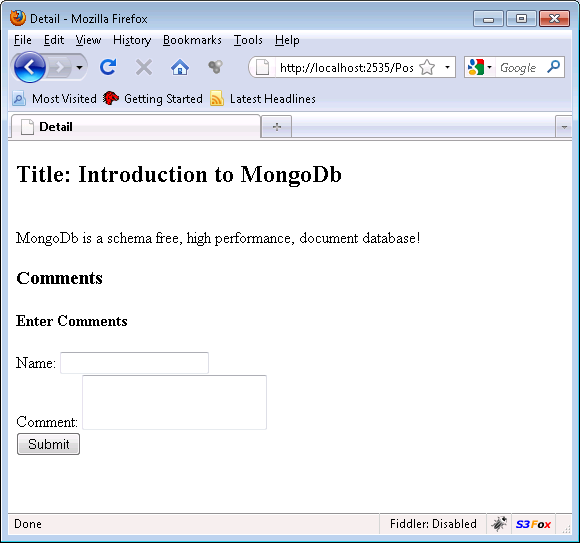
The Detail view is shown below:
Adding Comments to a Post:
The final task is to add comments for a post. The Detail view provide input elements to insert "Name" and "Text". The Detail view is implemented as follows:
The first thing to notice is that we are iterating through the Comments collection for our post object. If we find any comments attached to that post we display them. The Detail view also provide the user with "Name" and "Text" input fields which can be used to insert a new comment. The "AddComment" action is invoked when the form is submitted. The "Name", "Text" and the postId is transferred to the "AddComment" action in the PostController.
The AddComment action is implemented below:
We first retrieve the Post by using the parameter postId. After getting the post we use the AddComment method to attach a comment to the post. Finally, the _postRepository.Update is fired which updates the post with comments.
The Update method of repository is implemented below:
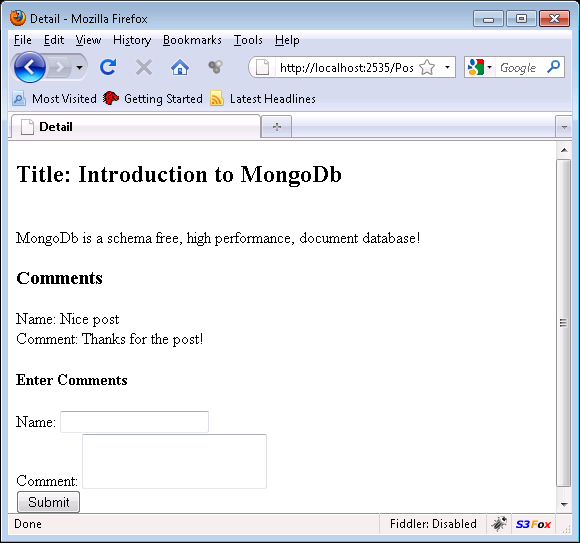
The screenshot below shows the comments attached to the post:
Conclusion:
In this article we learned how easy it is to integrate MongoDb with ASP.NET MVC framework and build a comment enabled blog in few minutes. MongoDb helps us to focus on the Domain of the application. And since it is schema free our domain expands automatically as the application develops.
UPDATE:
A number of people inquired about what type of MongoDb driver is used in this article. The driver is created by Sam Corder and it can be downloaded using the following URL: