Mobile devices are becoming extremely common in today's world. Most users can easily consume all the content on small mobile devices. This eliminates a need to carry a laptop computer with them all the time. We are entering into a new revolution in which mobile devices will be the main source of consuming content. IPhone is the most popular mobile device in the market today selling over 1 million devices in few days. In this article we are going to introduce IPhone development from the point of view of the .NET developer.
Prerequisites:

In order to develop for the IPhone you must first purchase Mac. If you are looking for less expensive solutions then Mac Mini will be an excellent choice. After buying the Mac you must download the XCode and the framework using the following link:

XCode

Creating Hello World Application Using XCode:

For .NET developers XCode is like Visual Studio. Actually, Visual Studio is much richer but I think you get the idea. XCode is an editor where you will spend most of your time developing IPhone applications. The language you will be using to write IPhone applications is called Objective-C. Objective-C is a language between C and C++. You can relate it mostly to the C-language which has some extensions to perform Object Orientation. Just like the .NET framework IPhone applications also uses the power of a framework. This framework is referred to as Cocoa framework. Let's start with creating a simple Hello World application.

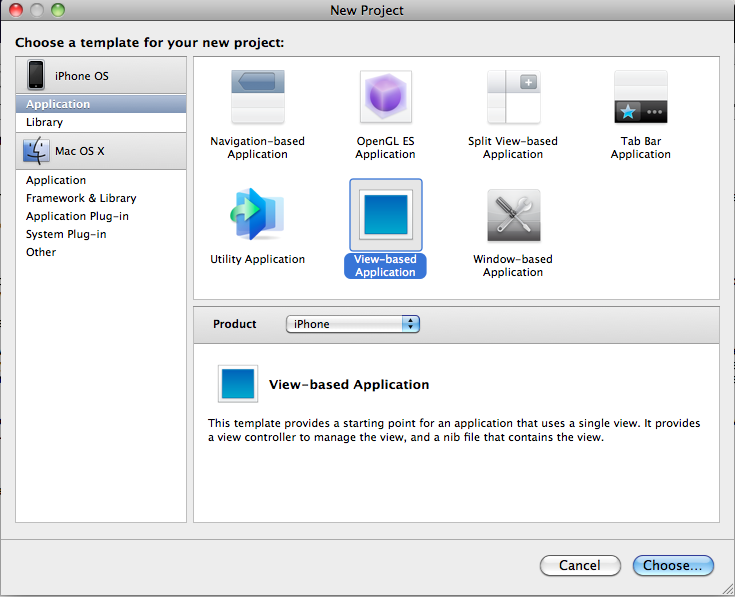
Click on XCode to run the application then select "Create a new XCode Project". This will present you with a screen where you can select a project template. Select the View-based application and then click "Choose" as shown in the screenshot below:


The next screen will allow you to name your project. Choose any name you desire we are going to call it "HelloIPhone". This will create a new application with the View-based template. There are several different folders created by default. The two key folders where you will be performing majority of your work are "Classes" and "Resources".

Classes: This folder holds the model and the controller classes associated with the project.

Resources: This folder consists of the design view files known as "xib" files. These files are created in a different application called "Interface Builder".

IPhone applications uses MVC (Model View Controller) pattern. If you are not familiar with MVC pattern then check out the following link.

Model View Controller Design Pattern

XCode will create the ".h" and ".m" files with the name of the project. Since, we named our project "HelloIPhone" a "HelloIPhoneViewController.h" and "HelloIPhoneViewController.m" file will be found under the "Classes" folder. The header file ".h" contains the prototypes for the implementation file.  The implementation file ".m" is where the actual code will be written.

The HelloIPhoneViewController.h" file contains the following code:


The @interface works similar to the .NET interface keyword. But the Objective C interface methods are not required to be implemented. Let's add a UILabel control to the HelloIPhoneViewController interface which represents a Label on the interface. The implementation is shown below:


The IBOutlet represents a control on the view. You can think of it as the declaration of any ASP.NET control in the code behind page. In our simple view we have an IBOutlet of type UILabel instance called "*greetLabel". The asterisk represents that it is a pointer to the UILabel class. The IBAction represents the event that will be fired from the view. The "-" sign indicates that it is an instance method and not static method. The greet method does not take any arguments and is not sure which control is going to invoke it.

The implementation file is shown below:


The greet method simply sets custom text to the Label control. We are not done yet. In the next section we are going to hook up the interface controls with the controller. This will be performed using the Interface Builder.

Hooking Events Using Interface Builder:

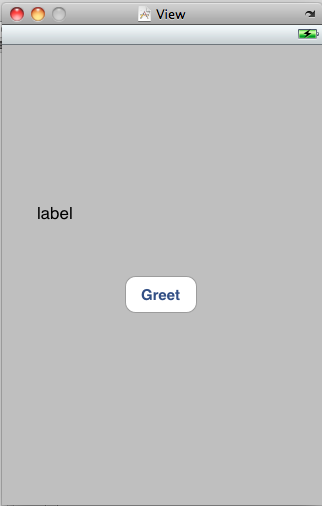
Interface Builder is a separate application which allows the developers to create the interface for the IPhone application. You can think of it as the design view for the Visual Studio. Click the "nib" file which will automatically open in the Interface Builder. Click on "Tools" and select "Library" this will open the "Library" tab. You can think of the Library as the Toolbox.  Drag and drop a UIButton control and a UILabel control on the view. Your interface will look something like the screenshot below:


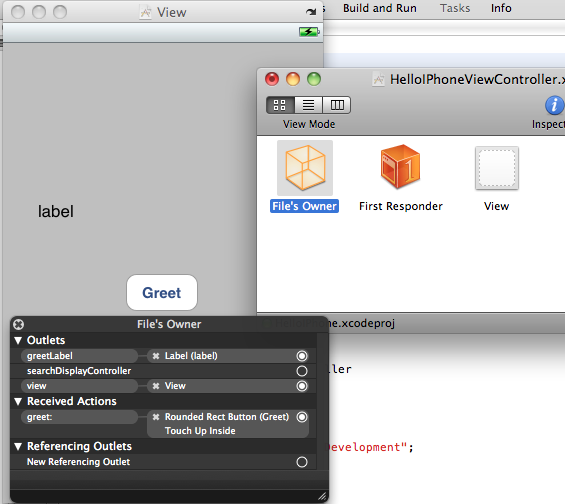
Now, let's hook up the events to the HelloIPhoneViewController. Right click  on File Owners icon. The File Owners icon will be visible when you open the "nib" file in the Interface builder.  After right clicking on File Owners icon a menu will appear which will display the controls and methods declared in the controller. Use the plus button and make a connection from greetLabel to the actual label on the interface. Also, make the connection from the greet method to the button. You can consider this as double clicking the ASP.NET controls and attaching it in the code behind view.


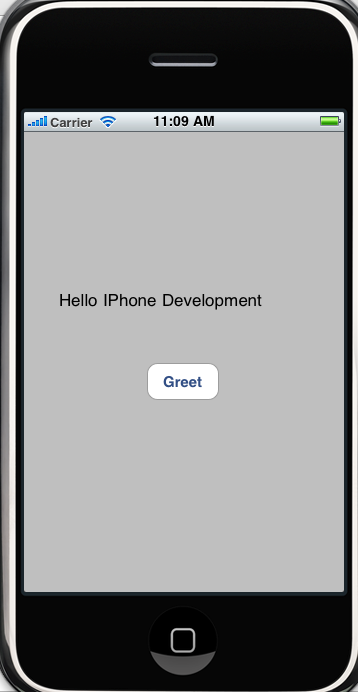
Now, run the application and click on the button you will see the following output:


Resources:

There are many different resources for learning IPhone development. Apple IPhone development website is filled with high quality content. Here are some other resources:

1) IPhone Development Center
2) Stanford IPhone Development Courses on ITunes
3) Beginning IPhone Development by APress
4) IPhone for Programmers

Conclusion:

In this article we learned how to get started with IPhone development. If you have .NET background then you might find IPhone development a different beast but remember that every beast can be tamed with lot of hard work and practice. In the future articles we are going to discuss drawing graphics for the IPhone.

[Download Sample]