In ASP.NET 1.0 the client side validation was not built-in. This means if you require client side validation then you must reach out to third party libraries like jQuery, xVal etc. In ASP.NET MVC 2.0 framework the client side validation is built-in. In this article we are going to demonstrate how to create custom client side validation using ASP.NET MVC 2.0 framework.
Adding JavaScript Libraries to the Page:
The client side validation is defined in a separate JavaScript files. In order to use client side validation you must add a reference to the following JavaScript files:
Using the Build-In Client Side Validations:
First we will look at built-in validators provided by the ASP.NET MVC 2.0 framework. This will give us some of the insights on how the client side validation works. We will use a very simple view which asks the user for "FirstName", "LastName" and "Age". The view is bind to the CustomerViewModel class which is implemented below:
As you can see all the properties are marked with the Required attribute. The Required attribute makes sure that the value for the property is provided by the user. The view is implemented below:
If you run the application you will notice that the validation is only fired on the server side. You will need to add the following line in your view to enable the client side validation.
Html.EnableClientValidation will inject the client side validation rules into the page as shown in the screenshot below:
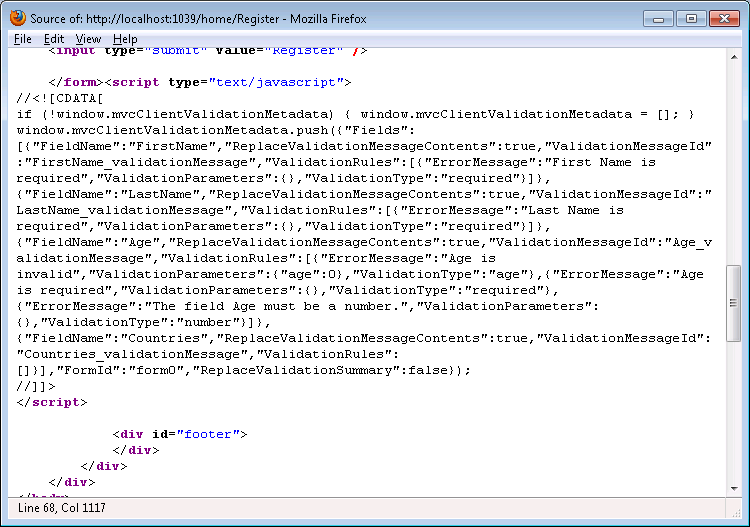
The screenshot shows that the rules are injected into the view and are ready to be invoked. At this point run the application again and you will notice that the client side validation is now enabled.
Creating Custom Validation Rules:
In the previous section we learned how to use the built-in validation rules in our ASP.NET MVC 2.0 application. In this section we will demonstrate how to create custom client side validation. Our custom validation ensures that the user's age is greater than or equal to 18. First we will create a new AgeAttribute which will derive from ValidationAttribute class as shown below:
In the real world scenario you will use date of birth instead of asking the user for the age. Next, decorate the CustomerViewModel with the AgeAttribute as shown below:
This will enable the server side validation for the custom attribute. If you submit the view with incorrect information you will notice that an error message is displayed provided that you have used the ValidationMessage HTML helper inside the view as shown below:
In order to create client side validation we must first create an validator for the custom validation. The "AgeValidator" is defined below:
The purpose of the validator is to create validation parameters and validation type which can be accessed from the client side code. The client side code is shown below:
The client side code retrieves the "age" parameter from the validationParameters collection which contains the minimum age defined in the AgeAttribute age field. If you are wondering how the "age" value got into the ValidationParameters collection then check out the implementation for the AgeValidator defined above.
The validation will be triggered on the blur event of the TextBox control. This means whenever the user leaves the TextBox the validation will be fired. If you are interested in using jQuery validation with your ASP.NET MVC application then check out the following article:
Getting Started with jQuery Validation
Conclusion:
In this article we learned how we can implement custom client side validation using ASP.NET 2.0 MVC Framework. In the next article we are going to take a look at the new features of the ASP.NET 3.0 framework.
[Download Sample]