iOS 7 framework introduced many new features which allowed the developers to create the next generation of applications. One of the most interesting feature is UIKit Dynamics framework. UIKit Dynamics allows the developer to create physics enabled effects which users can relate to the real world. In this article we are going to implement a notification banner control which utilizes the features provided by the UIKit Dynamics framework.
Design:
Before we start implementing the code we need to consider how the banner will be displayed and where it will be displayed. Most of the notification banners appear on top of the navigation bar. This quickly captures the user's attention without being obstructive. Take a look at the screenshot below which shows the banner in action:
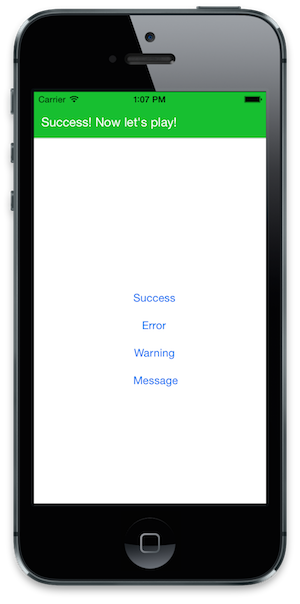
We are going to call our notification banner, AZNotification. Apart from providing the success messages the AZNotification will also provide the messages for errors, warnings and plain old messages for general purpose. Each of the notification message will be accompanied with its own color which will represent the mood of the notification type.
We also need to make sure that the usage of our AZNotification control is as simple as possible. The consumers of the control will create the notification messages using the following code:
The above code shows that displaying the AZNotification control is as simple as typing one line of code!
Implementation:
AZNotification control consists of two main files which are AZNotification and AZNotificationView. First, we are going to look at the AZNotificationView which contains most of the implementation. AZNotificationView is called from AZNotification and is sent the required parameters to create a custom view with the message.
The initWithTitle initializer method of AZNotification is shown below:
The above fields are defined below:
_title: The message that will be displayed in the notification banner
_referenceView: The container view which is used to setup the boundary
_notificationType: The type of the notification which can be Success, Error, Warning or Message
The initWithTitle method calls the setup method which create the view and subviews for the banner control.
The heart of the control lies in the applyDynamics method where the physics effects are applied. The applyDynamics control is implemented below:
The most important line in the above code is the following:
This adds a collision boundary which makes sure that our view does not fall through the screen. The item elasticity makes sure that our control bounces once it makes the collision. Finally, hideNotification is called to make sure that the notification disappear after few seconds.
Now, let's move to the AZNotification implementation. AZNotification only exist to provide the consumer with an easy way to create the notifications. As mentioned previously all the hard work is performed by the AZNotificationView. The AZNotification implementation is shown below:
The above code checks if the controller contains a navigation controller or not. If the navigation controller exists then the notification control is added to the navigation control. This makes sure that the notification banner always appears on top of the navigation bar instead of behind it.
Check out the demo of the AZNotification control below:
Conclusion:
In this article we learned about the UIKit Dynamics framework in iOS 7. UIKit Dynamics allows the developer to apply physics effects to their apps. In the future articles we will cover more features related to the UIKit Dynamics framework.
[Download AZNotification from Github]